Sunday, December 26, 2010

The Holidays - 2010

The Holiday Gathering - 12.18.10

As the Broyles homestead was once again back to normal after months of remodeling, we decided to host our Holiday Neighborhood Gathering again this year, opting for a Saturday, rather than a Sunday (too hard to schedule around Packer games).

I promised Steve (and myself) that I would cut the food back by 1/2. When last we hosted a holiday get-together two years ago, we sent people home with MOUNDS of left-over food. Must be a southern thing, but I am always afraid that I won't have enough.

This year's menu:

Tortilla Soup
Crustless Spinach Quiche
Angel Biscuits and Ham
Peach Mango Salsa and chips
Tzatziki and chips

Artichoke Dip with baguette slices
Veggie Platter with Onion Dip
Trifle
Cheese Cake made by Steve-on-the-corner
Coffee Cake made by Joan-two-doors-south

And here is the groaning table:


Here are neighbors Ruth and Sue chatting in family room (and poor Joan's truncated limbs on the left - sorry Joan!):


The pix below proves the truth in the old adage that states


"No matter where I serve my guests, they like my kitchen best!"


Here we see friend hubby serving as wine steward for Wendy and Marge:


Musical entertainment was suggested by Joan, our neighborhood Suzuki violin teacher and legendary performer in her own right. Alas, the pesky piano light hogged the spotlight (so to speak):


Joan and I were playing a hauntingly beautiful piece from Ken Burn's Civil War series on PBS. Alas, my stage fright has not gone away since it caused me to switch from being a music major (back when dinosaurs roamed the earth). That, and my lack of time to practice sufficiently (after all, I was also the cook!) made for some wobbly playing on my part, but Joan was superb!


Marge also played some carols, with Bob leading the singing.

I opted this year to forego a tree - so putzy to decorate and so time-consuming. Am happy to report that not one person noticed the absence of "O Tannebaum" - until I pointed it out. Phew. Not that I didn't decorate. I concentrated on...


the mantles; both in the living room:


and in the family room:


wreaths on windows:


garlands in chandeliers; in the dining room:


and in the kitchen:


The theme was red and green, inspired by the artificial cardinals and red peacocks that I found at Michaels:


My favorite "Oleander" bowl - brimming with orbs of burgundy, gold, bronze, pearl and red:


Even the grandmother clock was not immune from my bedecking hand:


On Christmas Eve, when we were all in the family room relaxing, the fireplace crackling (actually burning silently - after all, it is gas - but you get the picture) with Miss Molly-the-Cat lolling on the hearth and "It's a Wonderful LIfe" playing on TV, we had to compare this scene with the one a year ago. I was watching the same movie, but poor hubby was INSIDE the fireplace, working on the new insert (see first blog posting for pixs!). Indeed, what a difference a year makes!

Here's to a wonderful 2011 for all (and to one remodeling-free for us)!


Friday, August 27, 2010

Remodel - The Grand Finale (Part 3)

NB: I wrote this post months ago, but never got around to final editing - better late than never!

"The devil is in the details"

In my many years of doing free-lance design for others and in designing our own spaces, I have never subscribed to the adage "Less is More." However, I will admit that, as I slouch my way toward the golden years, I find that I have been paring down the many details in our home. Or as friend hubby put it in his inimitable way,

"I certainly hope you are not going to clutter up these new rooms when they're done!"

In fact, he said his rule of thumb (which of course I broke, but not by much) was to have only 3 pieces of furniture in each room.

However, design, like marriage, is all about compromises. So, in this final posting, I will share some of my design concepts that resulted in the final look of the rooms.

Paring down the clutter

When we began this project and started moving furniture and wall art in preparation for the construction phase, I decided that there were many things that I simply didn't want to reuse. In our early married life, Steve was transferred every 5 or 6 years, which meant relocating to another city or state. Moving that often keeps one honest vis-à-vis cleaning out stuff. And as George Carlin famously quipped in one of his monologues,

"A house is just a pile of stuff with a cover on it."

The spousal unit and I have lived in our little gem of a Tudor home for 19 years. That translates to 19 years of not having to pack up everything and move, thereby not being forced to toss anything out.

That said, we are both pretty good about donating stuff regularly to the local St Vincent de Paul thrift shop, but we decided that we would use this remodel project as an opportunity for major purging.

Legacies - a Milwaukee treasure trove

While much of our unwanted stuff found its way to our local St Vinnie's, the good items went to my favorite place in the world - Legacies - a consignment/estate sale shop. Steve learned the way to Legacies so well that he no longer needs to mapquest it. We took mirrors, furniture, framed art, you-name-it there. And received monthly little checks for our efforts.

However, what Legacies taketh, Legacies also selleth. Much to Steve's chagrin.

My first quest was for bedside tables that were not bedside tables. I've always delighted in using a piece of furniture for a purpose for which it was not intended. In our master bedroom, my bedside table is a marble topped metal outdoor garden table.

So, during the remodel project, I would stop in at Legacies from time to time, keeping my mind open for any intriguing possibility that could work as a bedside stand. Fortunately, I can pass Legacies on my way back and forth to meetings downtown if I take Port Washington Road...which my car sometimes decides to do.

Sometime in January, I found a delightful drop-leaf desk, complete with wooden inlays and cunning little drawers inside. Alas, Legacies thought this quite the desk as well, and priced it accordingly - way above my budget. But, as items are marked down 15% every month, I kept stopping in the store. You can imagine my surprise and joy to find it still there in July - at quite the affordable price. It is now in the new bedroom - I keep the drop leaf up for everyday use, but should we have guests, the drop-leaf will be down, at-the-ready for whatever items the guest wishes to keep at hand during his/her stay. The drop-leaf up:


The drop-leaf down:


At the same time, I was also able to snap up the lovely pencil sketch above this desk which was done in 1917 by a Gabriele Nicolet. It took six months for her price to come down enough for the family budget, but in resale shops, good things come to those who wait.


Tucked away in a cluttered corner of Legacies, I found this sweet little marble topped table:


My philosophy of shopping resale is the same on I employ for shopping at TJ Maxx, that is - one cannot go into these stores looking for something specific. Rather, one should enter with one's mind open to the all the possibilities.

Which is what I did one dreary day in March when I found a pair of these extravagant wall sconces. I was not looking for sconces, but instantly knew that they would be perfect in the old spare bedroom that was not touched during the remodel. Steve installed them, replacing some sconces that I'd never liked (even though I'd chosen them when we added the wall fixtures years ago):


The oil painting below the sconce was another late spring Legacies find. It's very common to find paintings of children with dogs, but not so much so with kitties - there are 2 felines in this lovely portrait.


My love affair with Michaels

As anyone who has ever used a frame shop knows, framing art for the walls can be an extremely expensive proposition. Through the years I have had framed many unlikely items that I've found in my spelunking trips in antiques stores and the like.

For this remodel project, I dug out some French art magazines (no, not THAT kind of French art magazine) from the 1920's and 30's that I'd lucked upon at an antiquarian book seller in Lexington Ky. The magazine was called L'Illustration and had reproductions of paintings glued onto the pages - which must have been an extremely time-consuming method of publishing because it would have to have been done by hand. For those of us of the more mature persuasion, we can remember seeing heavy art tomes in libraries years ago that were put together in this same manner. While the art work was nice in these magazines, I was more taken by the advertisements - full page and gorgeous. Lots of Art Deco.

So I went to Michaels and bought several inexpensive black frames. But instead of putting the magazine pages under the glass that came with the frames, this wonderfully pierced and tattooed young woman who works in the framing department (has to be an art student, I 'm sure) showed me the most marvelous thing. She could dry mount the page to be framed, then cover it with a plastic-like product that has a canvas finish (I assume it is a higher-end sort of contact paper). The results give the art work the apprearance of having been created on canvas - fabuloso! This also solves the bothersome problem that often arises when framing paper ephemera - the paper frequently forms waves and will not lie flat because of fluctuations in humidity.

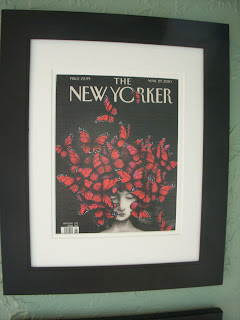
Here is a NewYorker cover that I had framed using the canvas overlay and no glass. This is an actual cover from the magazine - cover reproductions on their website cost $150.00 or better!


This next piece is actually a menu from a 1950's French Line ocean liner - shades of Cary Grant and Deborah Kerr in "An Affair to Remember" - also using the canvas-like treatment:


This treatment works really well for posters also. I had this 2010 Kentucky Derby poster framed under glass (before learning of this new method) and the poster started bucklng after only a week due to the humidity. Took it back to Michael's and...voilà:


Finally, in order to adhere to Steve's 3 pieces of furniture/room dictum (which I never quite met - so far the new bedroom and the old spare room each have 4 pieces), it was imperative to have one piece for all of the computer components/printer, etc in the old guest bedroom.


I found this beauty online @ Ballard Designs - both the printer and CPU are tucked into their own compartments behind doors on the bottom and the monitor and keyboard are in the upper section which has a capacious drop down door for work. There are also a file drawer, a smaller drawer for pens, checks, etc and a larger shelved area for supplies. Our next pc will probably be a laptop, but this piece will still work because the office still needs the printer and all the other office clobber. And when the dropdown door is closed, all that remains is a sleek cabinet.


But this was a behemoth of a desk - the delivery men would only bring it into the house on the 1st floor - no stairs they said. Sigh. So, we removed all the drawers and doors to lighten the load and it still took Steve plus Jason plus Chris-the-20-something-helper to get this puppy up our treacherous stairs with their pie-shaped steps. Am thinking that we'll leave this piece of furniture in place should we ever move!


And finally - the Pottery Barn daybed w/trundle in the old guest bedroom. Steve, Molly-the-cat and I all LOVE this daybed with its many pillows. Is perfect for a quick read or nap. Am embarassed to have to admit that I only had to buy the 2 bolster pillows for this bed - all the rest of the pillows were ones that I have accumulated through the years - some I made, some were finds at Marshall's or TJ Maxx.


Have always had a thing for pillows; which is something that men just don't get. I repurposed pillows for the daybed from other locations throughout the house and from those stored for occasional garden use when the weather was nice. Steve is thrilled that our own bed is down to 4 pillows, which makes getting into to bed at night and making the bed in the morning much easier!


By the way, I made the no-sew (well, no sewing-machine-sew) bed skirts on both the double bed in the new bedroom and on the new daybed in the old guest room. Fashioned them from sateen quilts that I'd lucked into several years ago at TJ Maxx. For the double bed, I simply put the quilt between the box spring and mattress - had to cut the corners at the foot and hand-stich the edges to allow for the foot board posts.


For the daybed it was simpler because there were wooden slats under the mattress - I simply cut lengths off 3 sides of the quilt, hand sewed the edges and staple-gunned each panel to the frame.

So, there you have it. Our massive project is done. And we are now well-equiped to handle guests - so, as we say in the south, "Yall come - our latchstring is always out for you!"


Remodel - The Grand Finale (Part 2)

Well, the best laid plans and all that...was unable to blog on Sunday because we awoke to a refrigerator that had died during the night - both the freezer AND the fridge side. Sigh. So all day Sunday was devoted to fridge shopping. And as happy as we are to get rid of the old side-by-side, this was not an expenditure that we really wanted to make at this time.

Plus the cabinet surround for the fridge was reused by us in the 1994 remodel - it must date from the 80's - a time of MUCH smaller fridges. Long story short (no pun intended), width is not a problem, but height is - so friend hubby had to remove the upper cabinet doors and cut out the bottom shelf to make way for a gorgeous french/door bottom freezer stainless beauty.

However, what the old fridge taketh timewise, the new fridge giveth back - I took a vacation day today to be home for the Sears delivery people, thus allowing me this time to blog.

But, as always, I digress from the topic at hand - The Grand Finale! So, here goes...


The Reveal (à la HGTV-land)...

The New Hallway

You know, it's strange, but I think that the new hallway that was carved out of the north half of the old little spare bedroom/office is our favorite part of the new addition. Here is the view looking east from the new bedroom:


The bookcases on the left were in that exact spot when this was the study - they were purchased when we first moved in from an unfinished furniture store. I had done a marginally good white pickled finish on them - remember the pickled wood craze from the 80's-90's? But the finish did not bear the test of time. So Bob the Painter worked his magic on them, spraying them with oil-based Benjamin Moore "Linen White" to match the woodwork. On the left near the top of the pix above, you can make out the new niche that was crafted out of old closet space. Here it is in its finished splendor:


Steve did the finish work on these shelves and the bottom one is a masterpiece - it matches exactly the bottom shelf in the niche at the bottom of the stairs. Here are close-up views:


and...


Here is the view of the new hallway looking west into new bedroom (double doors closed). You can see the infamous step that was necessary because of the builder error on the 1994 remodel. After all of our angsting over this step, we both really like it and think that it adds to the charm of the addition. Of course we haven't tripped up the step yet, so hopefully it will continue to be a lovely architectural feature and not a death trap!


And here is view looking west with double doors open:


The New Bedroom

We are both so pleased with the way that the new bedroom turned out. For now, it is the guest room, but we may decide to make it the master at a later date. In the pix below you can see the view to the north - I agonized over this elevation when we were working with the architect, trying to squeeze in some windows yet recognizing that this was the only wall for the bed. However, I needn't have worried because the light in this room is sublime - having the double windows on the west and a single window on the south is sufficient.


Here is the view to the southwest:


The New Bathroom

This truly is the Taj Mahal of bathrooms! The tilework is glorious and the frameless glass door in the shower is jewel-like yet oh-so-functional. And the bargain Hobo vanity looks really high-end.

The bathroom is smallish so taking pixs was a challenge. In this one I used the mirror to show the opposite wall - shower and toilet:


The vanity and the Pottery Barn mirrors:


We could only fit one towel bar in so we got the longest one that would fit:


So, there you have it.

The final blog posting will highlight all of the little decorative details that are, in my opinion, the neccesary finishing touches that make a room complete.

Saturday, August 21, 2010

Remodel - The Grand Finale (Part 1)

Greetings faithful followers of this blog...

I know, I know, we've been remiss about blogging about our project - I can't believe it's been 3 months since I last posted an update. But the intervening months have been busy, busy, busy. And with the arrival of those lazy, hazy, crazy days of summer, yours truly simply hasn't felt like sitting at the computer on weekends. Not that I've been outside cultivating our gardens, oh no.

Please permit me to whine a bit here about our summer thus far - basically it has been hotter than hades and so humid that we've run the A/C practically ALL summer!!! Hello, if I'd wanted hot and humid weather I certainly wouldn't have moved to Wisconsin.

In the 19 years that we've lived up here, I thought that the bargain struck by the early settlers with the weather gods was that we would endure miserably cold, snowy, gray winters that last for ten months and then we would have 8 glorious weeks of dry, sunny 70 degree days and evenings that were cool enough that you just might want a light blanket on the bed.

OK, maybe 8 weeks of WI summer is overstating things a bit - one of my Kentucky cousins maintains that our summers up here last 3 weeks...and he may well be correct because I can remember many a rainy cold June when we turned on the furnace in the evenings to take the chill off the house. But even if shortlived, summer up here is usually glorious - the payback for suffering through winter.


But I digress from the topic at hand: Ellen and Steve's Remodel Project and how did it all turn out.

Since our last post in early May, the tile guy and Steve the plumber were the first to finish up their areas of responsibilities. The third week of May, we went on our annual Kentucky sojourn to visit family and friends. While we were gone, Evolving Wood Floors sanded and applied the 2 coats of polyurethane to the new bedroom, new hallway, old hallway and old staircase and landing.

Poor Molly the Cat was sequestered in the family room with access only to the kitchen and the basement nether regions where her litter pans reside. We used the huge, unopened Pottery Barn boxes that contained the vanity mirrors to block both the doorway to the living room and the doorway to the dining room.

When we came back home, our favorite feline was no where to be found and wouldn't come when we called. We finally found her in the crawl space under the family room, perched on some rolled up rugs, glaring resentfully at her feckless owners. Steve actually had to crawl up and bring her out. She forgave us quickly, especially when she saw that she could have full run of the house again. Sheesh, as Queen-Of-All-She-Surveys, her humans should realize that they reside here only at HER pleasure.

The final week of May found Jason finishing up the old west facade; all the other trades were gone. So now we could remove rosin paper from the floor and return the rest of the house to normalcy.

But the remaining work to be done was ALL Steve's:

  • doors to be hung, then taken down and stained;
  • bathroom pocket door to be installed, then taken down and stained and painted;
  • windows to be trimmed/painted;
  • baseboard and shoe molding to be installed/painted;
  • mirrors and towel bars to be installed in bathroom; and
  • trimming the gaps where the stair treads had separated from the risers since the staircase was constructed 80 or so years ago.
Thus went the month of June.

We started on the staircase. We'd painted the risers "Linen White" years ago, but the sanding process had really bunged up the paint. And the existing paint was oil-based. Ugh. Because of the close work required for this, I was assigned this painting project (Steve still had his cataract at this point). It took an entire afternoon to just tape off all the surfaces! But the results are stunning, if we do say so ourselves!


The view down the stairs:


The view up the stairs:


And the landing:


Steve spent almost 2 weeks trying to stain the doors, to no avail. Solid wood, they were not cheap, but the wood was fir. And fir does not like stain. At all. Finally, after consulting with others who had attempted to stain fir, we decided that it was time for another of those compromises that one has to make in order to survive a remodeling project. We would paint all the doors in the new part of the house. As a transplanted southerner, where painted woodwork and doors are a way of life, I've always loved that look anyhow.

Of course the poor spousal unit had to strip all the stain off of the pocket door (with its fluted glass insert - nasty work) and the linen closet door before he could paint them. Fortunately, the garage didn't afford enough space for him to work on more than 2 doors at a time, so the double closet doors were spared the stain experiment. And the double entry doors to the bedroom hadn't arrived yet and so were untouched by stain as well.

Here are the stained/stripped/painted linen closet door and the painted double closet doors:


We reused the original glass door knobs on both of these closets, but had to buy reproduction glass knobs for the other doors.

We decided that, since the doors for the washer/dryer closet were in the existing hallway where all the other doors opening into other rooms were stained, we would pay an expert to stain those double doors. The painter (who more accurately should be called an artist) had to apply a faux grain finish to achieve the stained wood effect. Amazing job (but not cheap - cost was prohibitive to even think about letting him have-at the others):


We actually have Martha Stewart in both the linen closet and double clothes closets in the new bedroom. No, Martha is not in the closet herself, rather we used her modular closet kits from Home Depot. Steve determined that it was actually cheaper to buy her kits than for him to stick-build shelves and poles. Here is the linen closet:


And here is the clothes closet - as you can see, this closet still holds some project paint cans and the like - we have some touch-up painting yet to do:


So, thus endest part 1 of The Grand Finale. More to come, I promise. And you won't have to wait 3 months for the next installment!

Sunday, May 9, 2010

Remodel - Weeks 14 and 15


Nearing the Home Stretch...

Week 14 ushered in another week of warm and wonderful spring weather - unusual because our little corner of the world is normally cursed by the "cooler-by-the-lake" syndrome in spring. Temps can be in the 70's ten miles inland, but those of us residing next to Lake Michigan (Mother Nature's refrigerator) can find ourselves shivering with a lake breeze that makes things 10-15 degrees cooler. Brrrr.... But not so much so this year. In fact this has been the nicest spring we have experienced in our 19 years in southeastern Wisconsin.

The perfect weather allowed Jason and Steve-the-husband to continue their Hardie Plank minuet - Jason would hang the shingles while Steve would be painting furiously to stay ahead. Then, when each elevation was complete, Steve would climb up on the scaffolding to apply a 2nd coat to all of the shingles.

This pix shows the completed 2nd story addition in all its glory with its "Sealskin" paint and the scaffolding finally removed:


I really agonized over introducing this darker "Sealskin" to the color scheme, which had been 3 shades of gray (but now is 4). However, we are really pleased with the results. Using the darkest color on the second floor brings the monolithic height of the structure down to earth and makes it seem less massive.

In Week 15, Jason moved onto the old section of the 2nd floor, removing the cedar clapboards and adding the Hardie Plank shingles. In the pix below you can see that he is about a third of the way completed with the old 2nd floor elevation:


When this old section is completed, all that will remain on the exterior is the installation of the gutters and downspouts (we are still waiting for the downspouts - they were ordered at the same time as the gutters, but have not yet arrived - sigh.)

On the interior, the trades were coming and going during Week 15; yet thanks to Jason's excellent choreography, they were never in each other's way. Randy-the-HVAC-guy installed the galvanized pan for the washer/dryer closet that he had fashioned based upon a template that friend-hubby had mocked up:


Then, on Wednesday, the washer/dryer were delivered/installed. You can see in this pix that they have been pushed over to the left so the installers could hook them up. Steve will move them more towards the center when we begin using them.


Josh-the-hardwood-floor-guy installed the red oak in the new bedroom (you can see the infamous step-up in this view):


and married the new hardwood to the old where the two hallways join (when sanded and finshed, the old and new floor materials should blend together seamlessly):


Todd-the-tile-guy was also here in Week 15. He put up the cement board, mudded the shower pan and began the actual tiling on the floor using the basket weave tile. After grouting this, he laid the tile in the shower stall and then began setting the subway tile on the walls. In this pix you can see the completed floor and the progress being made on the walls:


Weather-wise, it pays never to get accustomed to anything in this section of the country. Springtime unceremoniously departed on Friday, with rain and temps plunging that night into the 30's. While we didn't get the snow flurries that were predicted, up north they got 2-3 inches of accumulation. Ah, May in Wisconsin - you gotta love it!

We are having a sunshiny day today, albeit with temps predicted to barely make it into the 50's for highs. Despite the weather where ever you are, a Happy Mother's Day to our dear readers of the female persuasion - be your children two-legged, four-legged...or both!