Sunday, March 21, 2010

Remodel - Week 8

Week 8 brought the unexpected gift of early spring in SE Wisconsin, so Jason moved outside to take advantage of the nice weather. He finished the soffit on the north dormer and then put roof shingles on both the north and south dormers. He also began the faux eave on the south side that will be a visual separation for the shake siding of the 2nd floor and the clapboards of the 1st; there will be a matching faux eave on on the north dormer as well.

The pix below shows the view from our neighbor-to-the-south's back yard - you can see the newly installed roof shingles on the south dormer:


Steve moved his shake painting operation out to the driveway on Thursday and Friday because the weather was so warm. Each shake shingle piece is 16"x42" and it takes him about 5 minutes to do each one. He is painting all the edges, the front and about 1 inch on the back side of each. He's completed about 60 so far out of the 300 necessary for the entire 2nd floor exterior. He's also painted all the fascia boards and soffits as Jason has needed them.

Thursday also heralded the return of Steve-the-plumber. He is a whiz at installing Pex - the new heavy-duty pvc that has replaced copper for waterlines. With Pex (as per Steve-the-husband) you only have to have fittings at the water supply and at the end-use-site. With copper, every time you make a turn, you have to solder a copper elbow or tee to the pipe which increases the potential of leakage. As you can see in the pix below, the pex simply bends where ever the plumber needs for it to go - plus it comes in pretty red and blue colors:


I hope, dear readers, that you are taking notes as you read this blog because there will be a test in the final posting and Pex tubing will be most certainly be on the plumbing 101 section of this exam (a score of 80% or better will certify you to undertake your own remodeling project).

As you may have guessed, the blue Pex is for the cold water and the red is for hot. There is such artistry in this installation that it's a shame to cover it up with drywall. Here is another pix of the Pex tubing and copper manifolds:


In the pix below, you can see that Jason has framed the wall between the shower (on the left) and the toilet (on the right).
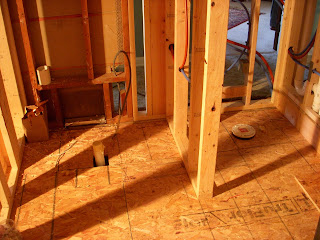


This wall was originally going to be part of the glass enclosure, then we changed to it a 1/2 wall with glass. It has finally evolved into a full wall due to the fact that the shower apparatus needed to be on that wall. Steve-the-plumber pointed out that we probably didn't want the shower head to be on the wall opposite the glass shower door (which was where it would have had to have been placed for either the 1/2 wall or full-glass wall versions) - because water would stream out on the bathroom floor anytime one of us reached in to turn on the shower. That Steve-the-plumber is a maestro of plumbing orchestration - his suggestions have really saved the day!

We are still getting bids for tile installation; we got the names of possible contractors from all directions (literally):
  • from Sue-and-Steve-on-the-corner;
  • from Mo-and-Jeff-to-the-north;
  • from Ruth-and-Bryan-across-the-street; and
  • from friend-Gini-at-work.

That was a total of 5 contractors recommended and Steve called them all. So far, only 2 have called and come by to measure the space in order to submit a bid. Additionally, Steve-the-plumber is sending someone on Monday. In remodeling, it's all about whom-you-know! Especially when it comes to good contractors.

It was the beautifully remodeled bathrooms of Sue-and-Steve-on-the-corner that originally inspired our quest for subway tile (they have a lovely Tudor of a vintage similar to ours). Then, on Thursday, we toured the recently remodeled Craftsman-style bathrooms of Ruth-and-Bryan-across-the-street. Their inspired use of subway tile and period materials in their gorgeous Arts-and-Crafts bungalow only cemented (you should excuse the expression) our desire for a tiled bathroom.

The final lighting decisions were made last week. In a musical-chairs move, the fixture in the pix below will be used in the new hallway leading into the new bedroom.


This fixture is original to the home and began its journey in the small 1st floor bedroom that we used as a family room when we first moved in. It was a small room (10'x11') and our furniture was placed cheek-by-jowl in such a fashion that our cats could walk around the entire room using the furniture and never have to touch paws to the floor. When we installed a ceiling fan shortly after moving in (pre A/C days), we moved the fixture to 2nd floor spare bedroom. In the 1994 family-room remodel project, we moved it back to the old part of the expanded family room (where it is in the pix above). Hopefully this little Art Deco gem-of-a-fixture will be happy in its new locale in the hallway leading to the new bedroom.


We have ordered another reproduction fixture from Rejuvenation for the family room to replace the well-traveled original fixture:


Sunday, March 14, 2010

Remodel - Week 7


The Art Deco Bathroom


We felt like time-travelers this week as we chose lighting, mirrors and plumbing fixtures, looking for all things Deco. We were so succesful with our choices that, should the spirits of any flapper-era "bright young things" (Scott and Zelda maybe?) decide to visit us and need to use the facilities, their ghosts would feel quite at home.

Our inspiration began with finding these reproduction Art-Deco Slipper-Shade sconces - you can imagine our excitement when we found these @ Rejuvenation - they are very close to the real thing (we've actually seen one - our neighbors-to-the-north, Jeff and Mo, lucked into one at Maxwell Street Days):


The sconces will flank the vanity on the side walls. The fit and finish of the sconces dictated the finish in the rest of the bathroom. The mirrors over each sink in the vanity will look something like this:


Next on the agenda was meeting with Steve-the-plumber to discuss faucets and shower configuration. He is an advocate of all things Kohler - says that the innards are better made and longer-lasting than those from the big box stores (whose faucet mechanicals tend to be made of plastic). So in our ongoing quest to balance style with cost, we opted for the Devonshire line for the trim:


The shower set-up discussion was protracted and difficult because of trying to balance the wish-list with cost. I had originally wanted a handheld shower on a slide-bar; I thought that it and the separate shower head should each have its own on/off diverters. Well, this would have required many valves and complicated piping. Long story short: we will have a separate handheld shower on the slide-bar but the compromise is that there will be a single valve/diverter for both. Which is a perfectly fine solution; after all, it is just a shower.

Interesting sidebar, Steve-the-plumber told us several stories of some of the high-end baths he's installed. It seems that on one of these jobs, lady wanted to surprise her husband with a brand-new shower/bathroom when he came back from a business trip. Money was no object. The fixtures for the shower alone cost $25K - that's a lot of body jets!

As most of the week was a rainy, foggy mess, Jason only got to work outside on Monday and Tuesday - he separated the double window and installed the single one - looks MUCH better than a double one would have. Plus we now have room to put a chest or another piece of furniture along that wall. In the pix below you can see that the soffit, rake board and trim have been added to the dormer and the single window is in place on the south elevation (behind the scaffolding and magnolia):


The city inspector came on Tuesday and pronounced the rough plumbing to be a masterpiece (well, actually he just said it passed inspection, but we KNOW what a feat it was to squeeze plumbing, electrical and HVAC in between the floor joists - so to all involved it WAS a masterpiece!)

Steve-the-husband has spent the entire week stringing electrical wires. I went down to the basement after work on Friday to get something out of the chest freezer - it was like fighting your way through a labyrinth of spaghetti! Here he is today putting in the junction box - you can see that he has brought some order to the wires as they are no longer suspended from the ceiling like one of those 1960's-era beaded peace-and-love curtains:


The first part of this week looks to be sunny and warm - Jason is anxious to return to working on the outside and Steve is thinking that he can move his shingle painting to the driveway. Can it be that spring is on its way to Wisconsin? Perhaps, but we haven't put the snow shovels away yet...after all, it wasn't all that many years ago that it snowed in May!

Sunday, March 7, 2010

Remodel - Week 6


"...you might as well..."

Ah yes, the "you might as well" syndrome - a well-known complication in the malady known as remodeling. As in:

  • You might as well replace the drafty wood burning fireplace with a more energy-efficient gas insert with side vent so that you don't have to re-route the chimney (which would have taken up valuable new real estate in the new bedroom); and

  • You might as well add pot lights to the family room as long as you have the roof off anyway; and

  • You might as well get a new tankless water heater as long as the current water heater is 8 years old and its vent would have had to have been relocated anyhow (believe it or not, that white rectangular box to the left of the breaker box in the pix below is our new tankless hot water heater); and


  • You might as well replace the 2nd story clapboards on the existing part of the house to match the shingles on the new addition; and

  • You might as well replace the fascia trim on the 2nd floor of the existing part of the house since you're replacing the clapboards; and finally

  • You might as well replace the entire flat roof on the old part of the house (even though you were hoping to only patch where the chimney had been) because the fiber board underlayment is failing.
SIGH.

It's the "you might as well's" that will make any remodel project grow and expand. But, what are you going to do? It does make sense to replace/repair things when previous "remuddles" and good old "wear and tear" rear their ugly heads. But there is a significant "ouchie-wah-wah" moment for each.


Week 6 was all about the roof and the bathroom - fitting in HVAC, plumbing and electric inside and the fixing the gaping chimney hole on the roof:


The washer/dryer closet got its raised floor this weekend and we are now the proud parents of a stackable Maytag Epic series pair in WHITE. Yes, WHITE. Despite my fervent desire to have RED, the frugalista trumped the fashionista on this one. Even I could not justify spending $350 more (each!!!) just for red. Of course our overarching theme on this remodel has been whatever decisions we make should be appropriate for the 1930's history of the house. And of course washers and dryers (did they even have dryers in the 1930's?) would have been white. We don't have to take delivery of the washer/dryer until we're ready for them - we just needed exact measurements and location of water hook-up and piping on the back of the washer - putting these babies in a closet demands precision!

And hence our choice to have polished chrome for the fixtures in the bath - not only is the polished chrome cheaper than brushed nickel, it's period appropriate (at least that's what we keep telling ourselves).

Steve has been the clean-up man after every trade that has come through (he says he feels like this is ALL that he does - he and the vacuum cleaner/shop vac are in a special relationship now). Also he's been painting the shingle panels and trim in the basement. He's painted 32 of the panels and has 75-100 to go!


Yesterday while Steve-the-plumber (not to be confused with Steve-the-husband) was doing the rough plumbing for the bathroom, we had to trek to The Tile Shop in south Milwaukee (yes, all the tile-vendors must have had a compact to set up shop in locations that are the furthest from where we live) to find tile. It seems that the basket-weave tile that I'd fallen in love with at the cheaper tile store (which didn't quote prices, you have to wait until your installer lets you know the cost) was $26.00 sq/ft!!! So much for my alleged thrift - and no wonder I loved it!

So, long story short, we found subway tile for $0.77 each (yeah); cornice tile for $12.99 (not so much yeah - but we don't need that many of them). Here is pix from display at store:


And this lovely stone basket-weave for the floor for $11.60 sq/ft (I think it is identical to the $26 sq/ft one):


Jason also framed in the knee-wall in the hallway leading to the new bedroom. Steve-the-husband will build in the bookcases that we originally had along this knee-wall when this was the computer room.


Thus endeth Week 6 of Ellen and Steve's "you-might-as-well" remodel project!